REVIEW · REYKJAVIK
Skaftafell: Small-Group Vatnajökull Glacier Hike (Moderate)
Book on GetYourGuide →Operated by Arctic Adventures · Bookable on GetYourGuide
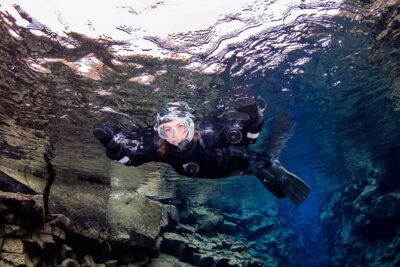
One step on the glacier and you get it. This small-group Vatnajökull hike takes you to Falljökull’s dramatic icefall with a certified guide, plus the safety gear you need to move on crampons with confidence.
What I like most is the way the trip turns scary-looking ice into something you can actually read and walk.
I also really love the time on the ice. You get about 4 hours hiking on Vatnajökull, not a quick photo stop and shuffle, and guides often make room for photo breaks and short explorations like ice features and even a cave-like section when conditions allow.
One possible drawback: this is not a stroll. You need sturdy ankle-support boots, and crampons only fit EU shoe size 35–50, with a minimum age of 14 for this tour. Plan for uneven, icy ground and a longer day overall.
In This Review
- Key things that make this glacier hike work
- Vatnajökull and Falljökull: what you’re really hiking on
- Starting at Skaftafell’s Arctic Adventures: the day begins in the right place
- The 4×4 transfer from Skaftafell: short ride, real payoff
- Getting kitted for crampons: the fit check is not optional
- Safety briefing and the “rope mindset”
- The hike itself: 4 hours on Vatnajökull’s icefall route
- Photo stops that don’t wreck your pace
- Glacier science you can actually use (Milankovitch, moraines, and change)
- What you’re paying for: $170 isn’t just a ticket
- Timing, weather, and what to wear (so you don’t hate the cold)
- Who should choose the moderate hike (and who should reconsider)
- Should you book this Skaftafell glacier hike?
- FAQ
- What’s the duration of the Skaftafell small-group glacier hike?
- Where do I meet for the tour?
- What safety gear is included?
- Do I need hiking boots with ankle support?
- What’s the minimum age, and is it suitable for kids?
- What shoe sizes work with the crampons?
Key things that make this glacier hike work
- Certified guide + full safety kit (helmet, harness, ice axe, crampons) so you’re not improvising on ice
- Falljökull icefall is the star, with jagged formations made by moving glacier ice
- Small group feel, which usually means better pace control and more time for questions
- Learn glacier basics on the move, including topics like moraines and glacier cycles
- Photo-friendly stops, timed into the hike so you’re not constantly rushing
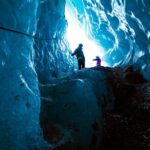
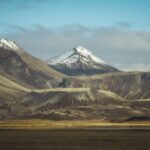
Vatnajökull and Falljökull: what you’re really hiking on
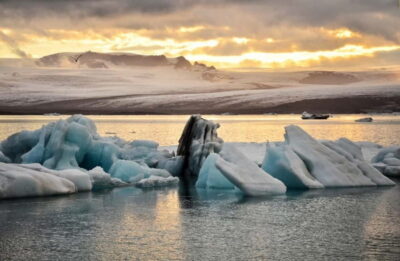
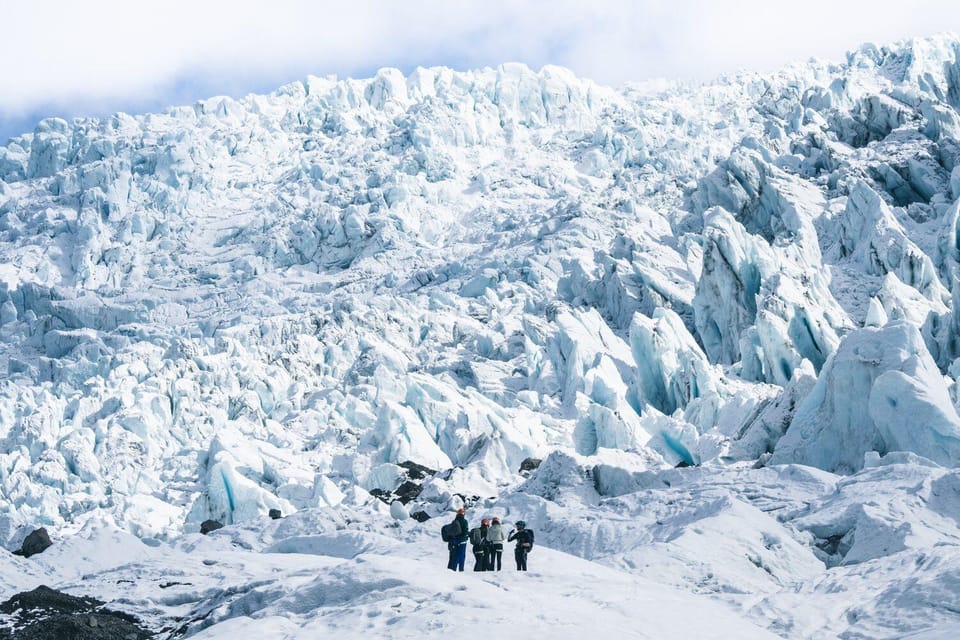
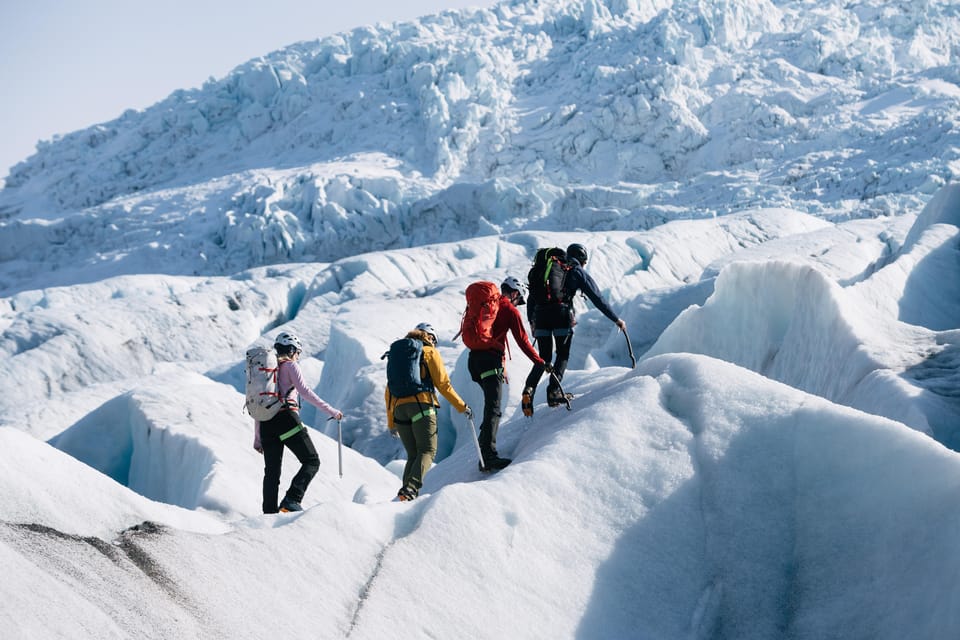
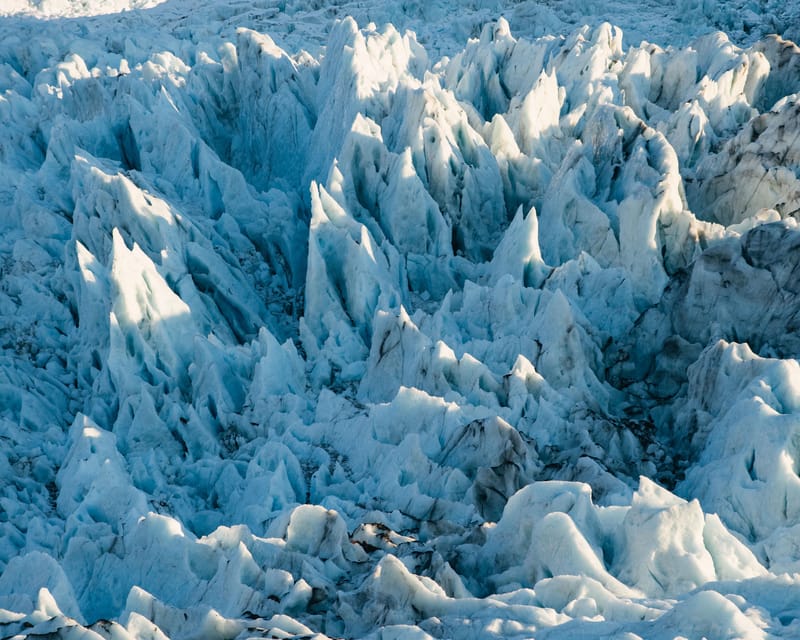
This hike is about walking on ice that’s still changing. Vatnajökull is Europe’s largest glacier, and Falljökull is one of its most eye-catching working parts, where ice flows and breaks into an icefall.
What makes the icefall special is the look of it up close. You’re not just seeing frozen white. You’re seeing cracks, stacked blocks, and “frozen motion” where the glacier’s flow creates angles and textures that look almost carved by hand.
The guides also connect what you see to how glaciers behave over time. On past departures, guides have explained things like Milankovitch cycles (how Earth’s patterns influence ice ages) and moraines (the way debris gets carried and reshaped). Even if you keep it casual, you’ll leave with a clearer sense of why this ice looks the way it does.
You can also read our reviews of more hiking tours in Reykjavik

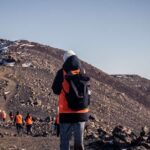
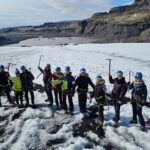
Starting at Skaftafell’s Arctic Adventures: the day begins in the right place
You meet at the Arctic Adventures booking hut inside Skaftafell National Park. This matters because Skaftafell is set up for visitors: you’re not hunting for a random parking lot, and you’re close to where you’ll gear up and get briefed.
Expect a real glacier day rhythm. You’ll get fitted and equipped first, then the group heads out. Guides often take the time to make sure everyone is comfortable before you step onto the ice, especially if it’s your first time on crampons.
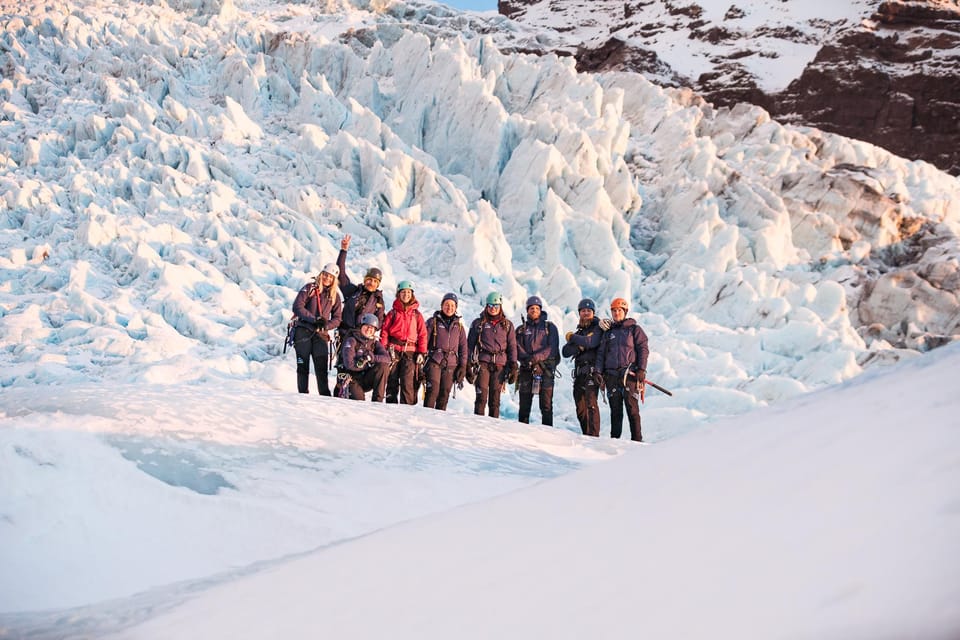
If you’re the type who hates feeling rushed, you’ll probably like this format. Several guides (names you might hear like Kristian, Ola, Lucy, and Sara) are praised for pacing the group, explaining what to do, and keeping things upbeat while staying serious about safety.
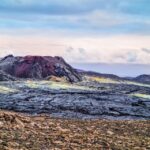
The 4×4 transfer from Skaftafell: short ride, real payoff
After meeting, you get about 20 minutes by 4×4 to the glacier area. It’s not a long trek from the start, which helps keep your energy for the real work—walking on the ice.
This transfer also makes practical sense. The glacier foot area can be rough and hard to access without the right vehicle. The tour handles it, so you’re not spending your morning in a rental car lottery.
One thing to plan around: your total day can feel longer than the headline duration. Even though the hike portion is listed as 4 hours, most people should budget for extra time on the day for fitting gear, briefings, and the bus rides.
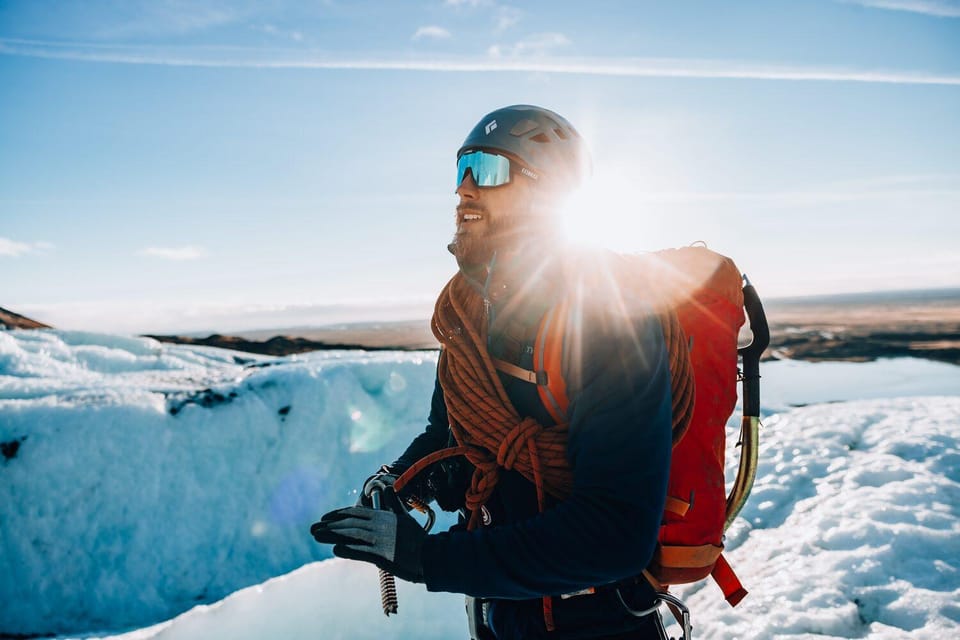
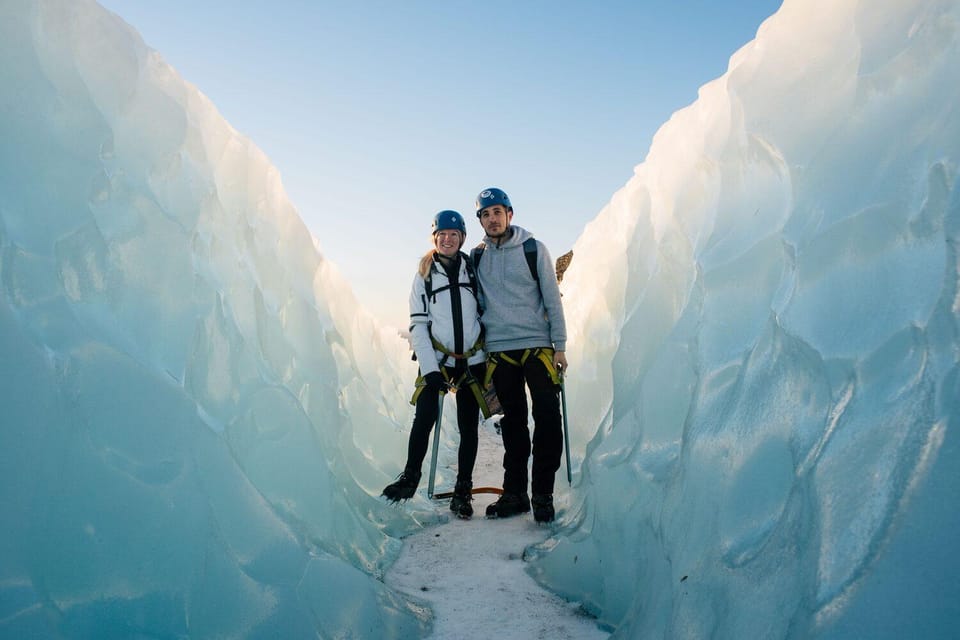
Getting kitted for crampons: the fit check is not optional
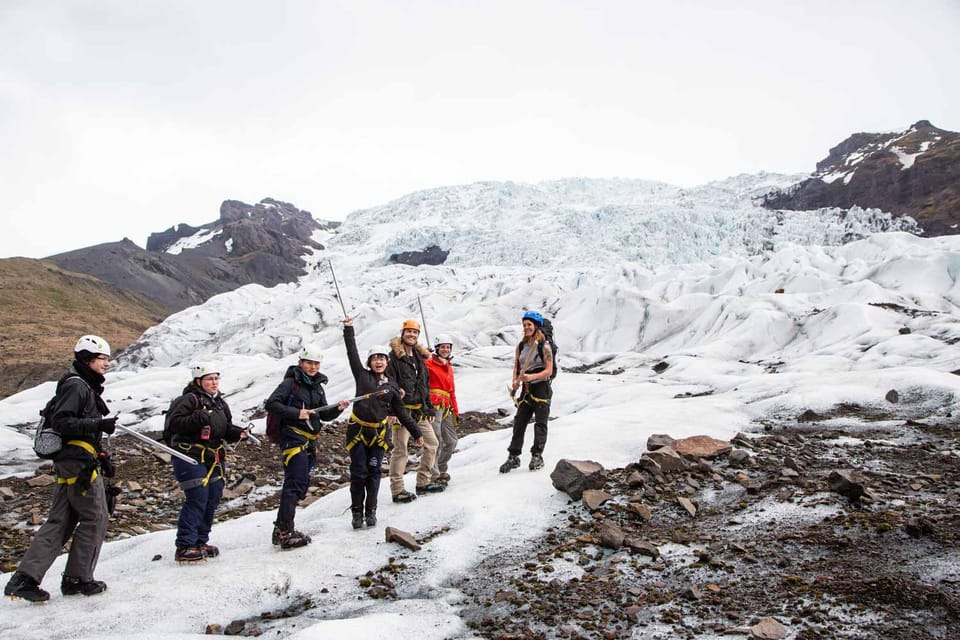
The tour provides the core safety gear:
- Helmet
- Harness
- Walking ice axe
- Glacier crampons
You’ll also get what you need for the walking part. That includes the crampons that attach to your boots, which is why boot fit matters so much here.
Here’s the practical detail I’d watch: crampons are only available for EU shoe sizes 35–50, and crampons can’t just go on any soft-soled footwear. One of the most repeated points from people doing the hike is that the soles need to be stiff enough for crampons to grip correctly, and the staff may inspect your boots early to decide whether you need to rent the right pair.
So, if you show up in flexible hiking shoes, you might end up scrambling for rentals. If you’re going to save stress, bring boots that are already broken in and ready for icy walking, with ankle support.
Safety briefing and the “rope mindset”
This hike is moderate, but it’s still a glacier. That means you’ll follow guidance closely and walk at the pace of your group.
You’ll start with a safety briefing before you head deeper onto the ice. The goal is simple: you learn how to move without overthinking it. Expect instruction on balance, how to place your feet on crampons, and how to use the axe for stability.
In some outings, guides have used ropes and set up safe routes for more adventurous sections. People have specifically described rope-assisted climbing or carefully arranged paths to get up and down steeper ice. That tells you what kind of day this is: not hard-core technical climbing, but also not “casual walking on a glacier.”
Names that come up often for strong safety leadership include Josh, Kristian, Ola, and Henrik. The consistent theme across guides is trust and control—especially when the terrain gets uneven or slippery.

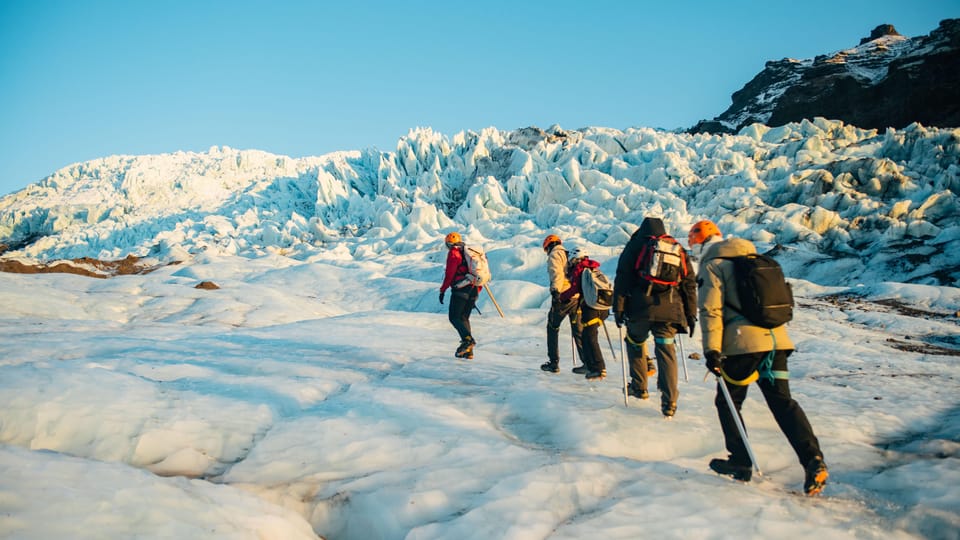
The hike itself: 4 hours on Vatnajökull’s icefall route
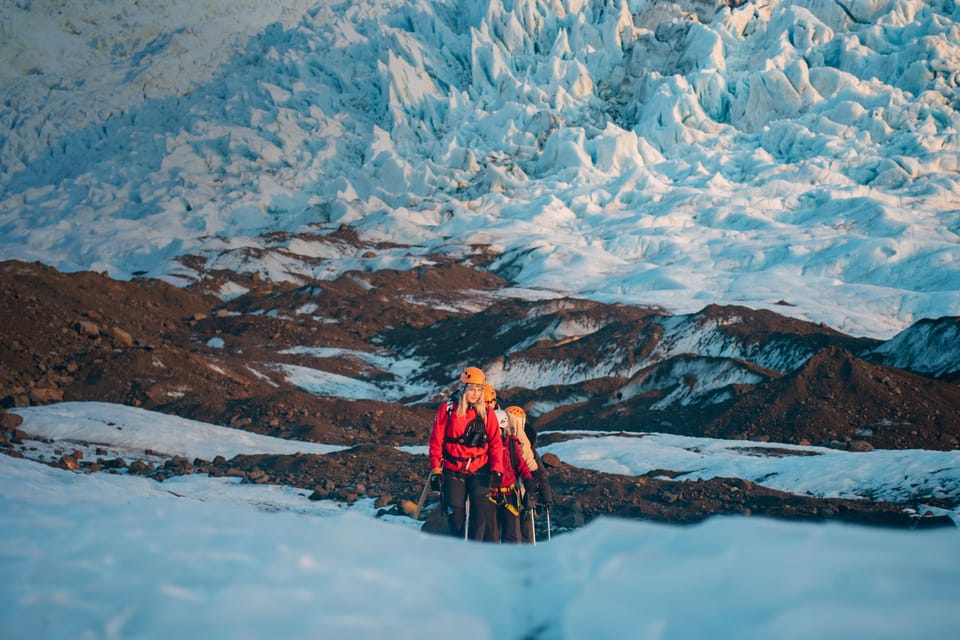
On paper, it’s straightforward: you walk to Falljökull, gear up, then spend about 4 hours hiking and exploring. In real life, that time feels like a series of mini-challenges and rewards.
The day typically starts with a scenic walk through glacial terrain before you reach the glacier tongue. Then you switch from “getting there” mode to “moving on ice” mode—crampons on, safety gear checked, and the route begins.
From there, you work toward the icefall. The ascent is where the moderate rating comes from. You’re stepping up and down on uneven ice surfaces, crossing frozen streams, and navigating areas with jagged features.
Along the way, you’ll also get time to stop and look. This is not a nonstop grind. Guides build in photo breaks, and they point out the kinds of ice formations you only notice once you know what you’re looking at—stuff like the way the ice fractures, stacks, and shifts.
One helpful way to prepare mentally: think of this as walking on a slick, irregular surface where footing matters. If you’re comfortable on uneven ground at home—trail rocks, roots, sloped paths—you’ll likely adapt quickly. If you struggle with stairs, steep descents, or long walks, this can feel more intense than you expect.
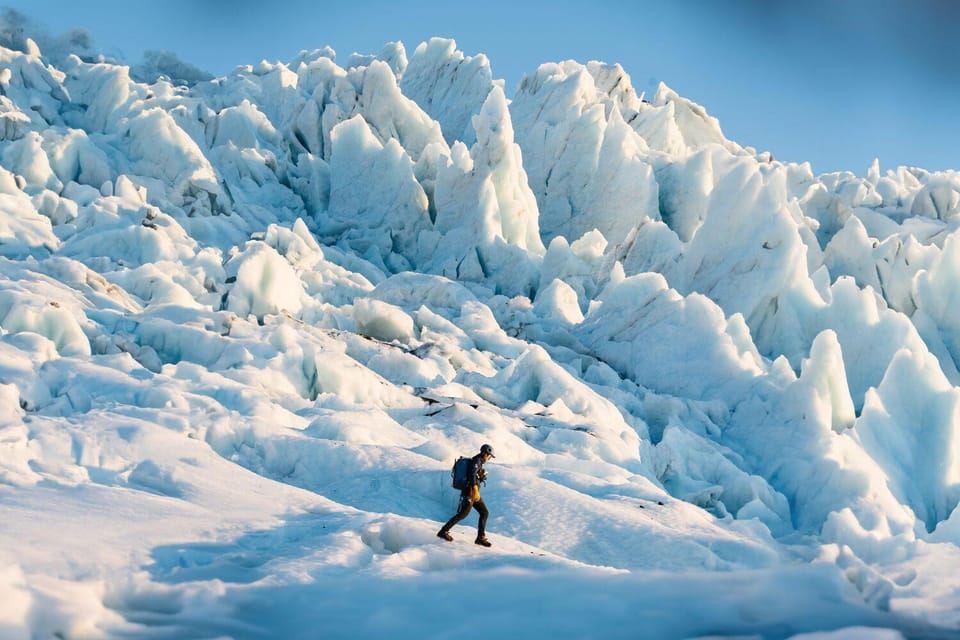
Photo stops that don’t wreck your pace
The icefall at Falljökull is one of those places where the best photos happen when you pause at the right moment. The good news is the tour is built around that.
Guides are often praised for finding solid viewpoints and giving people time to shoot. You’ll get enough pauses to capture the icefall’s jagged geometry and the way light changes across the creases.
Also, don’t ignore the smaller scenes. Some of the most striking moments on the glacier aren’t wide shots. They’re close-ups: the texture of ice, the edges of formations, and the way meltwater channels or cracks look when you’re standing right beside them.
If you like photos, bring a small bag for extra layers and keep your hands free when you’re moving. On crampons, you want balance more than fiddling.
Glacier science you can actually use (Milankovitch, moraines, and change)
I like tours where science isn’t just a lecture. This one tends to teach through what you’re seeing.
On past departures, guides have discussed:
- Milankovitch cycles, connecting Earth’s changes to long-term ice behavior
- Moraines, explaining how debris gets carried and left behind as glaciers move
- How glaciers reshape terrain over time, so the present-day forms make sense
The real value here is perspective. Once you learn that the icefall isn’t static, you start noticing signals: fractures, movement patterns, and why certain routes get chosen for safety.
And because you’re on the glacier for hours, the explanations stick better. You’re not hearing about ice while sitting safely on land. You’re learning while your boots are literally attached to the ice.
What you’re paying for: $170 isn’t just a ticket
At $170 per person, this hike isn’t the cheapest activity in Iceland. But it’s also not overpriced for what’s included.
You’re paying for:
- A certified glacier guide
- Safety gear you’d otherwise have to buy or risk using incorrectly (helmet, harness, ice axe, crampons)
- 4×4 transport from Skaftafell to the glacier area
- A longer block of time on the glacier: about 4 hours hiking
That combination matters. Glacier safety is not the place to cut costs. Gear quality, guide skill, and route planning are what keep this fun instead of stressful.
If you’re comparing options, think like this: the easy glacier tours often feel shorter on ice. If you want time to walk, explore, and learn without feeling rushed, this moderate hike is usually the better value.
Timing, weather, and what to wear (so you don’t hate the cold)
Conditions can change fast here, and the tour notes that timing may vary based on season and other conditions. That’s normal for Vatnajökull.
Dress for wet cold. Even if the weather looks fine at the start, you’ll be outside longer than you think once equipment and movement time are included. Several people recommend bringing snacks and water, since you’ll be working up an appetite once you’re on crampons and climbing/descending sections.
A practical packing mindset:
- Warm layers that you can vent if you get moving
- Gloves you can handle crampons with
- A small snack plan and water
- A dry layer you’ll want after the hike
Who should choose the moderate hike (and who should reconsider)
This tour has clear fit rules:
- Minimum age is 14
- Not suitable for children under 14
- Minimum shoe size is 35 EU
- Crampons are only available for EU shoe sizes 35–50
So this is best for hikers who can walk a long, uneven route and handle slippery footing. If you’re already a regular hiker, you’ll likely find the moderate sections doable, just physically demanding.
It’s also ideal if you want more than a quick taste. Many people highlight that they chose the moderate option because it gives them a longer, more personal feel on the ice.
If you’re unsure, don’t overestimate your tolerance for cold and steep steps. A glacier hike is one of those activities where your legs and balance matter just as much as your sightseeing mood.
Should you book this Skaftafell glacier hike?
Book it if you want:
- Hours on Vatnajökull with real glacier terrain underfoot
- Falljökull’s icefall as the main event
- A guide-led day that uses safety gear and route planning, not guesswork
- A moderate workout that still feels approachable for experienced walkers
Skip it or choose another option if:
- Your shoe size won’t work for the crampons range (beyond EU 50, or below 35)
- You’re not ready for uneven icy walking and a longer day outdoors
- You’re going with someone under the 14 age minimum
If you match the fitness and gear requirements, this is one of the best ways to understand Vatnajökull beyond photos. The icefall is the kind of sight that stays in your head, and the fact that you walk on it (with proper safety) is what turns it from impressive to unforgettable.
FAQ
What’s the duration of the Skaftafell small-group glacier hike?
The tour is listed as 5 hours total, including the guided hike on the glacier and the transfers.
Where do I meet for the tour?
Meet at the Arctic Adventures booking hut in Skaftafell National Park.
What safety gear is included?
You’re provided with a helmet, walking ice axe, harness, and glacier crampons, plus a certified glacier guide.
Do I need hiking boots with ankle support?
Yes. Sturdy hiking boots with ankle support are mandatory, and boots are available to rent.
What’s the minimum age, and is it suitable for kids?
The minimum age is 14, and the tour is not suitable for children under 14.
What shoe sizes work with the crampons?
Crampons are available for EU shoe sizes 35–50. Shoes outside that range can’t participate because the crampons are not available.